Wednesday, February 25, 2015

It's a Cake Fest and a bit of news.


Wowzers, it seems I am on the cake making train lately. Not that I am complaining, there is something so decadent about a piece of cake that no other dessert can match. This is a cupboard version - nothing fancy schmancy in terms of ingredients - just a great simple choc cake. This number is super moist and superbly easy. Enjoy it xo


¾ cup cocoa powder
1 ½ tsp vanilla extract
250g butter (1 block)
1 cup caster sugar
2 ½ cups soft dark brown sugar
6 eggs, lightly beaten
3 1/3 cups plain flour (low protein if you have it), sifted
5 teaspoons baking powder
1 teaspoon salt
200ml buttermilk
70ml full fat milk
Chocolate Buttercream
50g unsalted butter, softened
40g cocoa, sifted
350g icing sugar, sifted
½ tsp vanilla extract
Pinch of sea salt
30ml whole milk
110ml double cream (or if you are after a slight tang use sour cream)
Method
Preheat the oven to 170C.
Grease and line 2 x 18cm cake tins and set aside.
Place the cocoa powder, vanilla and 180ml boiling water in a heatproof bowl and whisk to combine. Set aside.
Using the stand mixer, add the butter and sugars to the bowl and beat for 3-4 minutes or until well incorporated. Add the cocoa mixture and beat to combine. Add half the flour and baking powder and beat until just combined add half the milk and buttermilk continuing to beat and scrape down the side of the bowl. Repeat with remaining flour and milk mix until just combined. Divide the mixture between the two tins and bake in the oven for 50 minutes or until a skewer inserted in the middle comes out clean.  Allow to cool in tins before turning out to cool completely on a wire rack.
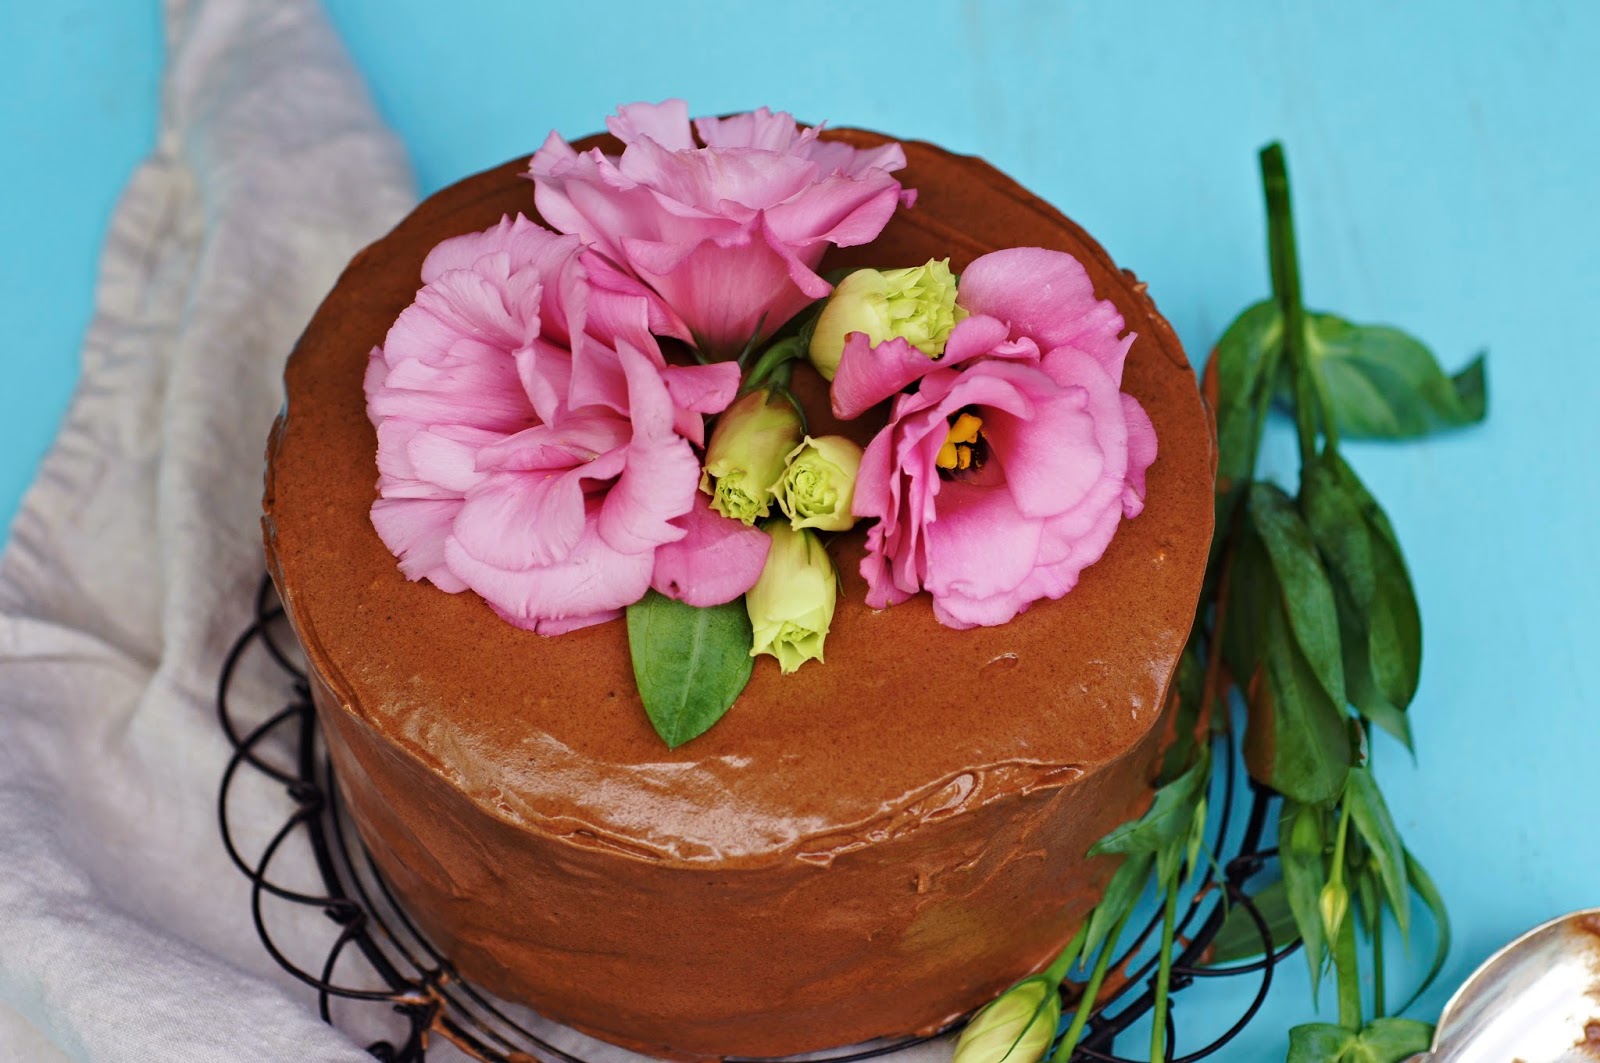
While the cakes are cooling make the butter cream.  Beat the butter for 4-5 minutes  on high speed then add the cocoa powder and beat until you have a paste. Add the icing sugar, vanilla, salt milk and most of the cream and beat together slowly until combined then high to a smooth consistency. Ice the top of one cake and sandwich with the other. Ice the whole cake and dress with flowers or candles if using.

In other news

The French edition of Bistronomy has hit the shores of France. The French publisher Marabout has slightly edited the cover, this version is dark and moody, I love it although cannot say it beats the original edition which has a very special place in my heart.


Also my delightful editor at Fairfax Daily Life has left Syndey for Washington DC for a 12 month sabbatical and I was tasked with making her going away cake (no pressure). I decided on a vanilla bean sponge with a lemon curd centre and covered it in Italian meringue with some fresh berries, edible flowers and silver leaf. Here is a pic of the end result. It was rather pretty I must say.


Wednesday, February 18, 2015

Buttermilk Doughnuts with Spiced Mulberry Jam and Chai sugar and dried flower dusting

What are those little puffed magic delights I hear you ask? Oh just some buttermilk doughnuts with spiced mulberry jam and a chai sugar and dried flower dusting THAT YOU WANT SWASHING ABOUT YOUR INSIDES IMMEDIATELY.
Hear this my fellow children of the 80s, these puppies are the food equivalent of the magical library book in the NeverEnding StoryFerris Beuller's Day Off (the entire day), One-eyed Willies hidden treasure in the Goonies and that epic fist pump in the closing scenes of The Breakfast Club. So good!
I realise I am making rather grand proclamations about a doughnut but this batch is particularly tasty and I recommend you get involved. You and the fine people lucky enough to enjoy them will not be disappointed.
Of course you don't have to make your own jam although I've supplied a recipe just in case – you can sub in with a good quality store bought version and I am willing to admit that the dried flowers look super pretty but with all the spice working in these they do not add to the flavour. It's a looks thing so feel free to omit if you don't have any.  
You can also bake these if you don't want to give them a quick tan in some oil and you can swap out the sugar in the dusting for a coconut sugar if you are that way inclined.
Enjoy them. I really think you will.  Best eaten on the day of making.

(Makes 20 doughnuts)

Ingredients
Doughnuts
250ml buttermilk, lukewarm
1 x 7g sachet dried yeast
1 vanilla bean, seeds scraped
450g plain flour
55g caster sugar
A pinch of salt
1 egg at room temperature, lightly whisked
35g butter, softened at room temperature
Rice bran oil for deep frying
Mulberry jam
250g mulberries
3/4 cup caster sugar
1 tablespoon fresh lemon juice
Sugar dusting
220g caster sugar
2 teaspsoons ground cinnamon
1 teaspoon ground nutmeg
1 teaspoon ground cloves
1 teaspoon ground ginger
1 teaspoon ground cardamom
½ teaspoon ground fennel
dried edible flowers (optional)

Method

Combine the buttermilk, yeast and vanilla in a bowl. Add 1 teaspoon of flour and 1 teaspoon of the sugar and whisk until combined. Set aside for fifteen minutes.
Place the flour, sugar and salt in the bowl of a stand mixer. Attach the dough hook and mix briefly until combined. Continue the motor running on low and pour in the buttermilk mixture, egg and melted butter.  Mix until the dough comes away from the bowl and is smooth and elastic. It will still feel slightly sticky. Cover with a tea towel and set aside to rest at room temperature for 90 minutes or until the dough has doubled in size.
To make the jam place all ingredients in a saucepan and place over medium heat. Bring to the boil and using a large metal spoon, remove any skim that froths to the surface and use the spoon to help breakdown the mulberries. Reduce heat to low and simmer until a jam consistency is reached – about 30 minutes.
For the sugar dusting combine all the ingredients in a large shallow dish and set aside.
Line two large trays with baking paper. Gently roll the dough into golf ball sized doughnuts and place on the trays. Leave some room as the dough will puff and rise again. Cover with a tea towel and let rest again for 40 minutes.
Heat the oil in a large heavy based saucepan over medium high heat until it reaches 180C. If you don't have a thermometer you can check by adding a tiny bit of doughnut dough – it should bubble lightly around the surface and rise to the top very quickly. Deep-fry the doughnuts in batches, turning often for 2-3 minutes or until puffed, golden and cooked through. Transfer to paper towel to drain briefly and while still hot gently toss in the sugar to coat all sides. Allow to cool slightly.
Transfer the jam into a piping bag and gently pipe into the centre of each doughnut. Serve slightly warm.


Wednesday, February 11, 2015

A Picnic Bar for Grown Ups

I'm generally not one for the malarkey of Valentine's Day and the gently simmering bain-marie of the whole industry's chocolate, flowers, table for two forced ideals of romance. But I can always get on board with a dessert – one that covers off on all scenarios for those who embrace February 14 to those who just like chocolate, and those of us who will use any excuse for a spot of baking. Enter the Picnic Tart. All inspiration is blatantly taken from the humble Picnic Bar and all things chocolate, caramel and wafer baked into a tart to ensure this is a simple pleasure done as well as it can be. And that's true love.
Ingredients
1 x sheet Careme chocolate pastry
110g excellent quality dark couveture chocolate
1 egg
125ml cream
1 x packet chocolate or vanilla wafers
Salted peanut caramel
395g caramel con leche (or at an absolute pinch caramel top n fill)
½ cup roasted peanuts, roughly crushed
sea salt to taste
Method
Preheat oven to 180C.
Lightly grease an 11cm x 33cm loose-bottomed tart pan. Roll pastry between 2 sheets of baking paper to 5mm thick then use to line the tart pan. Chill in the fridge for 20 minutes.
Combine the peanuts and caramel con leche in a bowl until well combined. Gradually add salt to taste. You want that balance of sweet, salty and fat.
Line the pastry with baking paper and pastry weights or uncooked rice. Blind bake for 10 minutes then remove paper and weights and bake for 5 minutes or until pastry is dry.
Allow to cool then pour in the caramel and cover the base of the tart. Gently push the wafers into the peanut caramel in a horizontal pattern.
Reduce oven heat to 150C.
Heat the cream and milk in a saucepan over medium heat until just below boiling. Pour over the chocolate and stir until melted, smooth and completely combined. Add the egg and stir until the mixture starts to thicken and look glossy. Pour the chocolate mixture over the top of the wafers and caramel – there will be just enough to coat over the top. Place in the oven and cook for 10 – 12 minutes until the chocolate top has slightly puffed and just set. Allow to cool then slice and enjoy.

Thursday, February 5, 2015

Food Writing and Food Photography and Styling Workshops

I'll be honest, I am slow on the uptake with social media. I only joined instagram a few weeks ago. 
(@kcoquette) I am guilty of dragging my heels in the world of selfies and the me-conomy or so they call it. But there are times that I love it, because often you have chance encounters with people that lead to friendships and likeminds that you may otherwise not have had the opportunity to enjoy. And that is exactly what has happened with Sneh Roy - blogger and cookbook author of the beautiful Cook Republic
Sneh and I, since becoming friends on twitter have become friends in the real world and I love her energy and her eye for beauty with the lens. One of the most gorgeous food photographers in Australia and quite the recipe writer to boot!
Photo by Sneh Roy
We've decided to join forces and we are offering a series of workshops this year. First cab off the rank is a food writing and food photography and styling workshop. Spots are filling fast but we would love to have any Sydney based foodies out there come and join us for a fun filled session where Sneh and I take you through some low downs and experiences in the world of food writing and photography. Whether you are starting out and want to improve your blog or you want to improve your already impressive food writing portfolio we are here to help. And there will of course be amazing snacks and a lunch to finish at the end. We can't wait to meet you.
Photo by Sneh Roy

Photo by Sneh Roy
Photo by Sneh Roy
Photo by Sneh Roy
The details

 A super creative and engaging food writing, food photography and styling workshop. 60% Practical and 40% Theory. Challenge your inner foodie by learning to write for a blog, a newspaper or a magazine. Learn to create fresh new content. Hands on writing and photography practice for different styles and medium whether it is a blog or print publication. Explore the art of travel food writing, food reviews and shooting accordingly. Learn to style food with props to create an atmospheric story of travel and culture.
Date - 20 March, 2015 (Friday)
Time - 10:30am-3:30pm
Venue - The Cook Republic HQ in Hornsby Heights, NSW 2077 (Address emailed once booking confirmed)
Who - Brimming with ideas and inspiration, this creative half day workshop in Sydney will be taught by Katrina Meynink and Sneh Roy.
Katrina Meynink is a freelance food writer and author. She regularly contributes to national and international food magazines and writes weekly for Fairfax’ Daily Life. Katrina has published two books, most recently Bistronomy: French Food Unbound with Murdoch Books and her first book, Kitchen Coquette (Allen & Unwin), was awarded Best First Cookbook 2011 (Australia) at the Gourmand World Food Cookbook Awards. Katrina has a Masters in Gastronomy through Le Cordon Bleu and the University of Adelaide, an Advanced Diploma in Taste through Hautes Etudes du Gout, Paris, as well as qualifications in business journalism; and culinary training through Le Cordon Bleu. She has received numerous scholarships from the James Beard Gastronomy Foundation and the Culinary Trust, USA. Most recently, Katrina was awarded the Julia Child Grant via the Culinary Trust, USA.
Sneh Roy is an award winning food and lifestyle photographer, stylist, recipe developer, designer and creator of the highly popular blog - Cook Republic. Sneh is also the author of the Tasty Express cookbook published by Random House on 2014. She is ELLE Australia's ex-food columnist. Her work has been published and featured in many leading publications throughout the world and she has worked with many leading brands including Feast, ELLE Australia, Taste Magazine, Bon Appetit, Food & Wine, The Simple Things, Campbell's, Vitamix, I Quit Sugar, Coles, Lavazza, Nespresso, Inside Out, Ford and Huffington Post. When she is not shooting and styling for apps and cookbooks, you can find her at a local market sourcing for unusual ingredients or creating handmade ceramics at a studio nearby.
What
- What exactly is food writing.
- The key differences between blogging and commercial work and what to look out for.
- Styles of food writing and finding your voice.
- Developing and refining your pitch.
- Tips and tricks for improving your food writing.
- Food Photography styles to suit different styles of writing.
- Shooting for a blog and publication. Challenges and demands of editorial food photography.
- Spot briefs and exercises to create food stories and shoot them with the use of props, people and surrounds.
Food - A lovely morning tea will get you started as you eat, shoot and acquaint yourselves over cups of tea and baked goodies. You will also be able to sit down to a delicious lunch with Katrina and Sneh and discuss all things related to food writing, editorial writing, food photography, styling or anything under the sun. Nourishing juices and smoothies from Pressed Juices will keep you fuelled through the day.
Requirements - Workshop is open to everyone from the amateur writer and camera novice to the expert. Please bring your DSLRs, favourite lens and smartphones. You may bring your tablets or laptops for note-taking if you prefer.
Extras - Shop a bargain at the carefully curated Prop Table for beautiful vintage props for your food photography and styling (cash only). Katrina & Sneh's signed cookbooks will be available to purchase.
This is where we will enjoy lunch after the workshop

Developing your story concept. Photo by Sneh Roy